How to repin later OBDII ECU to work with early OBDII ECU

Discussions concerning the M7790 cpu

Moderator: Matt

Post Reply
UNISA JECS
 

Posts: 367
Joined: Wed Jun 04, 2008 3:48 am
Location: USA Socal

How to repin later OBDII ECU to work with early OBDII ECU

Post by UNISA JECS »

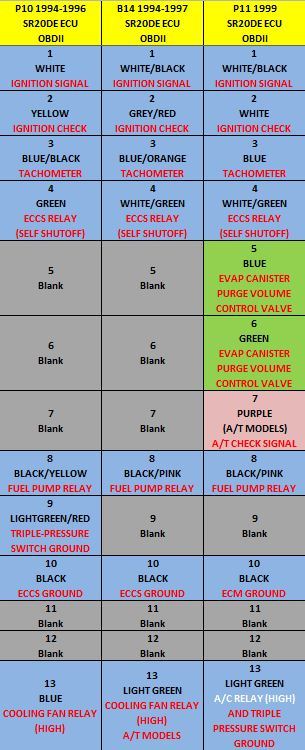
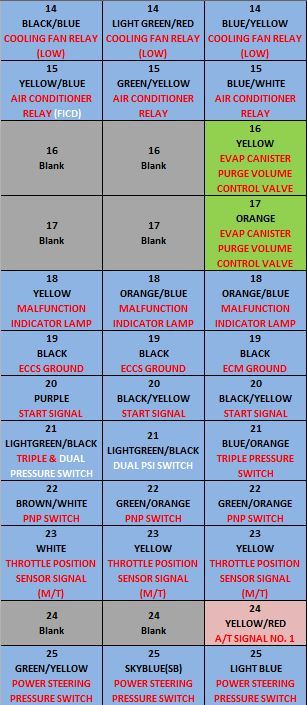
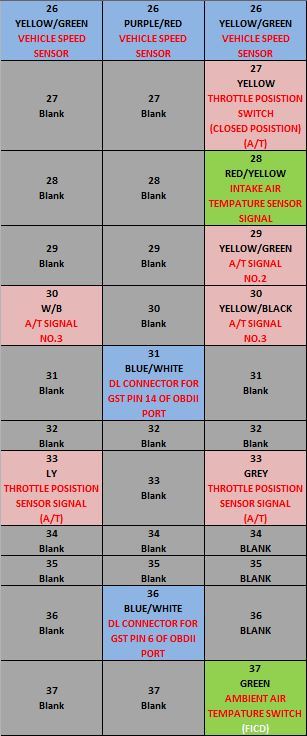
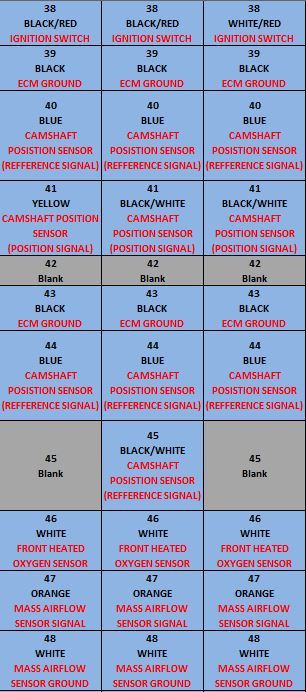
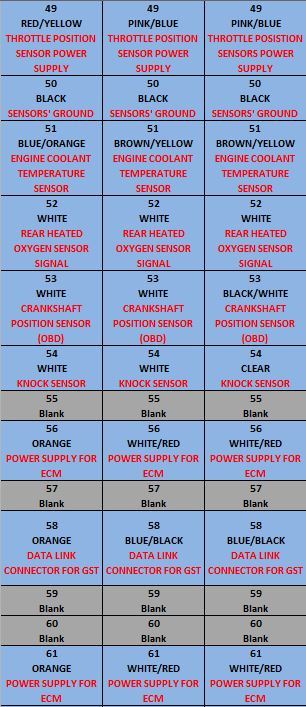
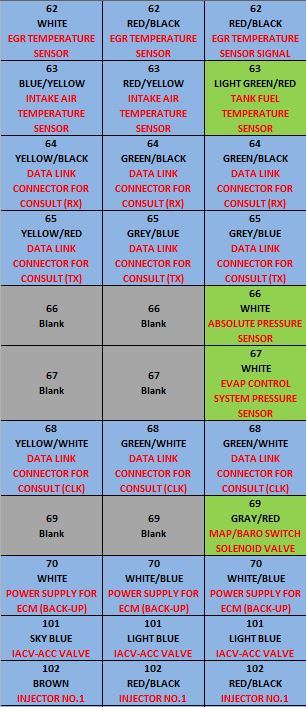
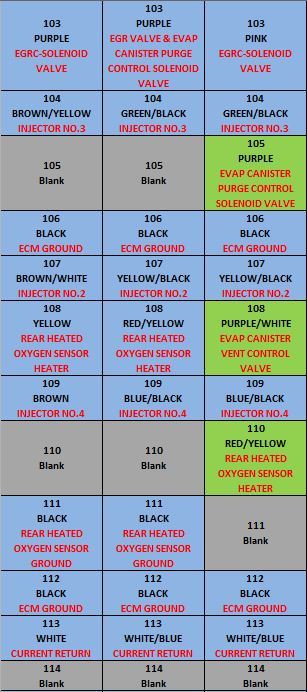
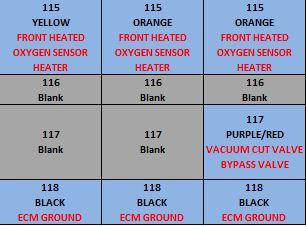
This guide will help you sort through which ECU terminals need to be swaped, deleted and added.

Essentially this is made for people who own a USDM 1999 P11 (G20) SR20DE and or 1998 B14 (Sentra/200SX) SR20DE with OBDII ECU's and wish to use an earlier style OBDII ECU which is compatable with a Nistune board.

Enjoy, this took me quit a while make:

Image

Image
Matt
Site Admin
 

Posts: 8990
Joined: Sun Jan 29, 2006 1:45 am
Location: Adelaide, Australia
Contact:

Re: How to repin later OBDII ECU to work with early OBDII ECU

Post by Matt »

Looks similar to my notes which I helped someone with via email
1998
+ Pin 5 EVAP purge control valve
+ Pin 6 EVAP purge control valve
- A/C triple pressure switch
+ Pin 15 EVAP purge control valve
+ Pin 16 EVAP purge control valve
+ Pin 27 Throttle closed switch
+ Pin 28 Air intake sensor
+ Pin 63 Intake Air Temp > Tank fuel temp sensor Pin 66 Absolute
+ pressure Pin 67 EVAP pressure Pin 69 MAP/BARO switch Pin 105 EVAP
+ Canister purge Pin 108 EVAP Vent
- Pin 116 EVAP Vent

These are fine with this loom, apart from Intake air temp should be swapped from Pin 27 to Pin 63 since I assume that other valves are not connected to the 1998 loom

Other difference which affect you mostly is this one:
- Pin 108 Rear O2 sensor heater (now EVAP vent in 1998 loom)
+ Pin 110 Rear O2 heater (not on 1996 ECU)
- Pin 111 Rear O2 sensor heater ground (use ECCS ground instead)
UNISA JECS
 

Posts: 367
Joined: Wed Jun 04, 2008 3:48 am
Location: USA Socal

Re: How to repin later OBDII ECU to work with early OBDII ECU

Post by UNISA JECS »

Since photobucket went down sometime ago and killed a bunch of link I re-did my excel pin comparison if anyone finds this helpful

Can also be found here on my facebook page https://www.facebook.com/UNISAJECS/
https://www.facebook.com/media/set/?set ... aa5a63ecfa

This guide is to be able to allow the 99 P11 guys who have bought and chipped a Nistune 94-97 B14 ECU or plan to in the future also applies to 98-99 B14 guys.

This is going to be an on going guide but i'll start it off with a picture with instructions.

Decided to re-host these since im working on a P11 right now and having to go over these things once again so enjoy, damn photobucket killed the game

To try and sum it up here's what you gotta do for running a P10 ECU

Move pin 28 (AIT sensor) P11 harness to pin 63 position for P10/B14 ECU and eliminate the EVAP wire (Green/Red) cap it off not used anymore

Move pin 110 (RHO2 sensor HEATER) p11 harness to pin 108 position for P10/B14 ECU and eliminate EVAP wire (Purple/white) cap it off not used anymore

Splice into pin 118 (ECM Ground) P11 harness to pin 111 position for P10/B14 to become RHO2 Sensor Ground

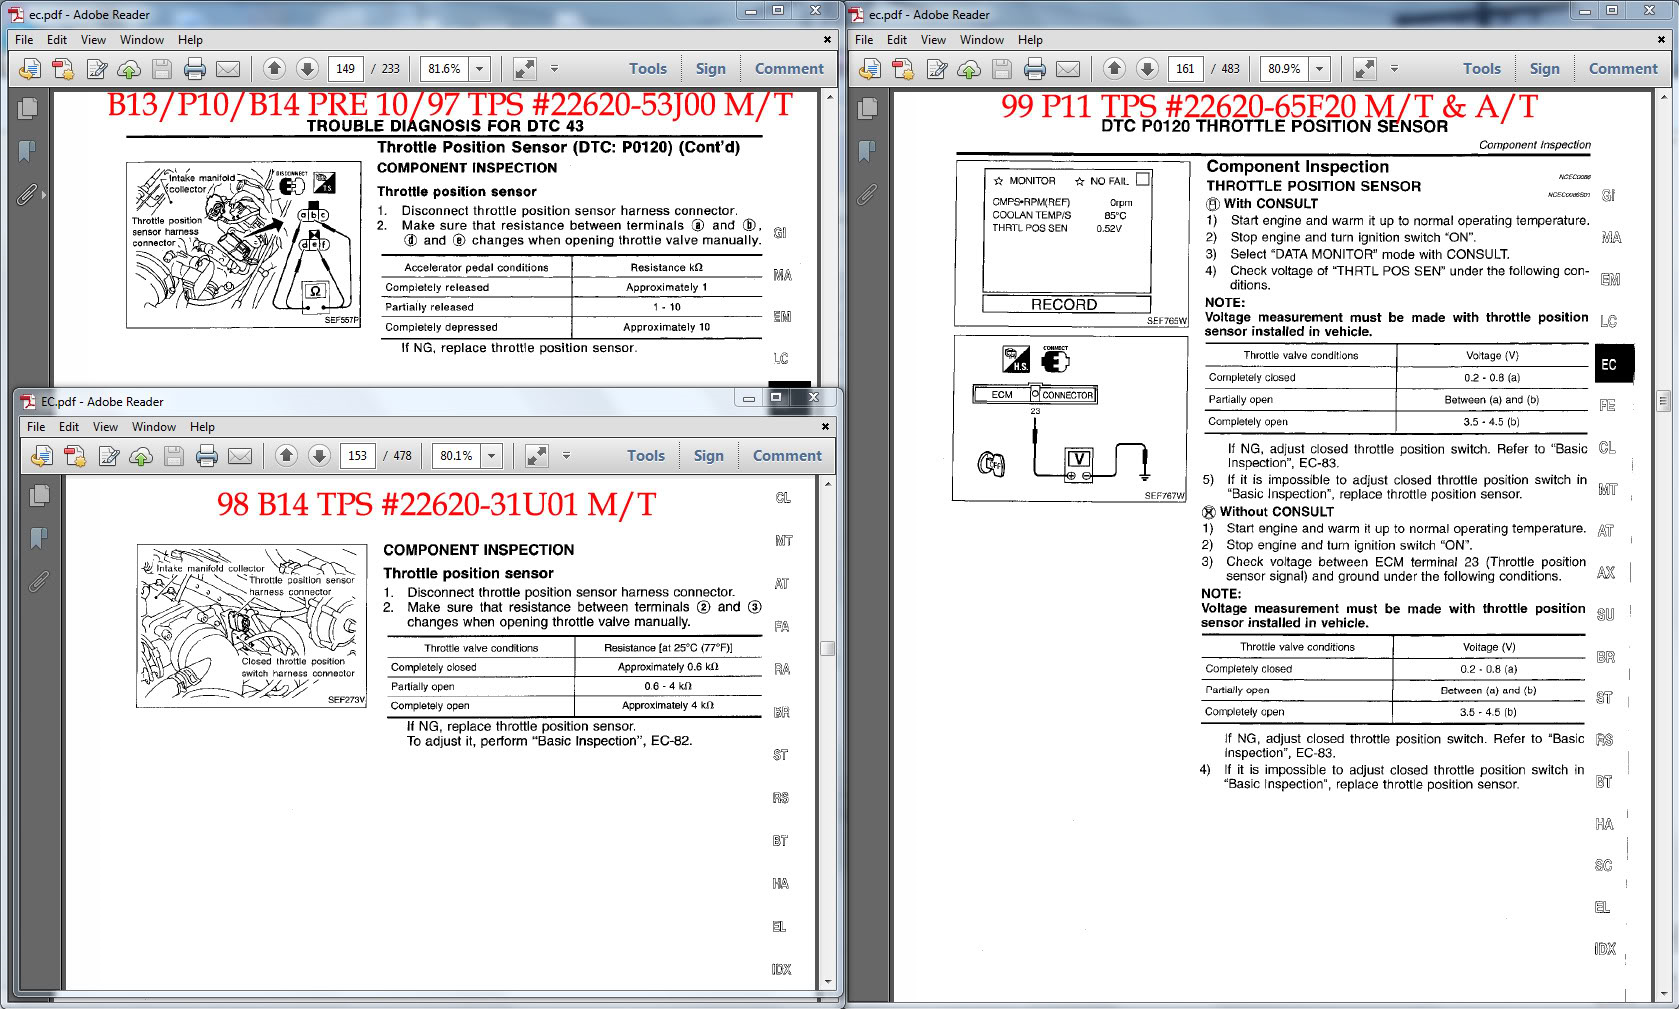
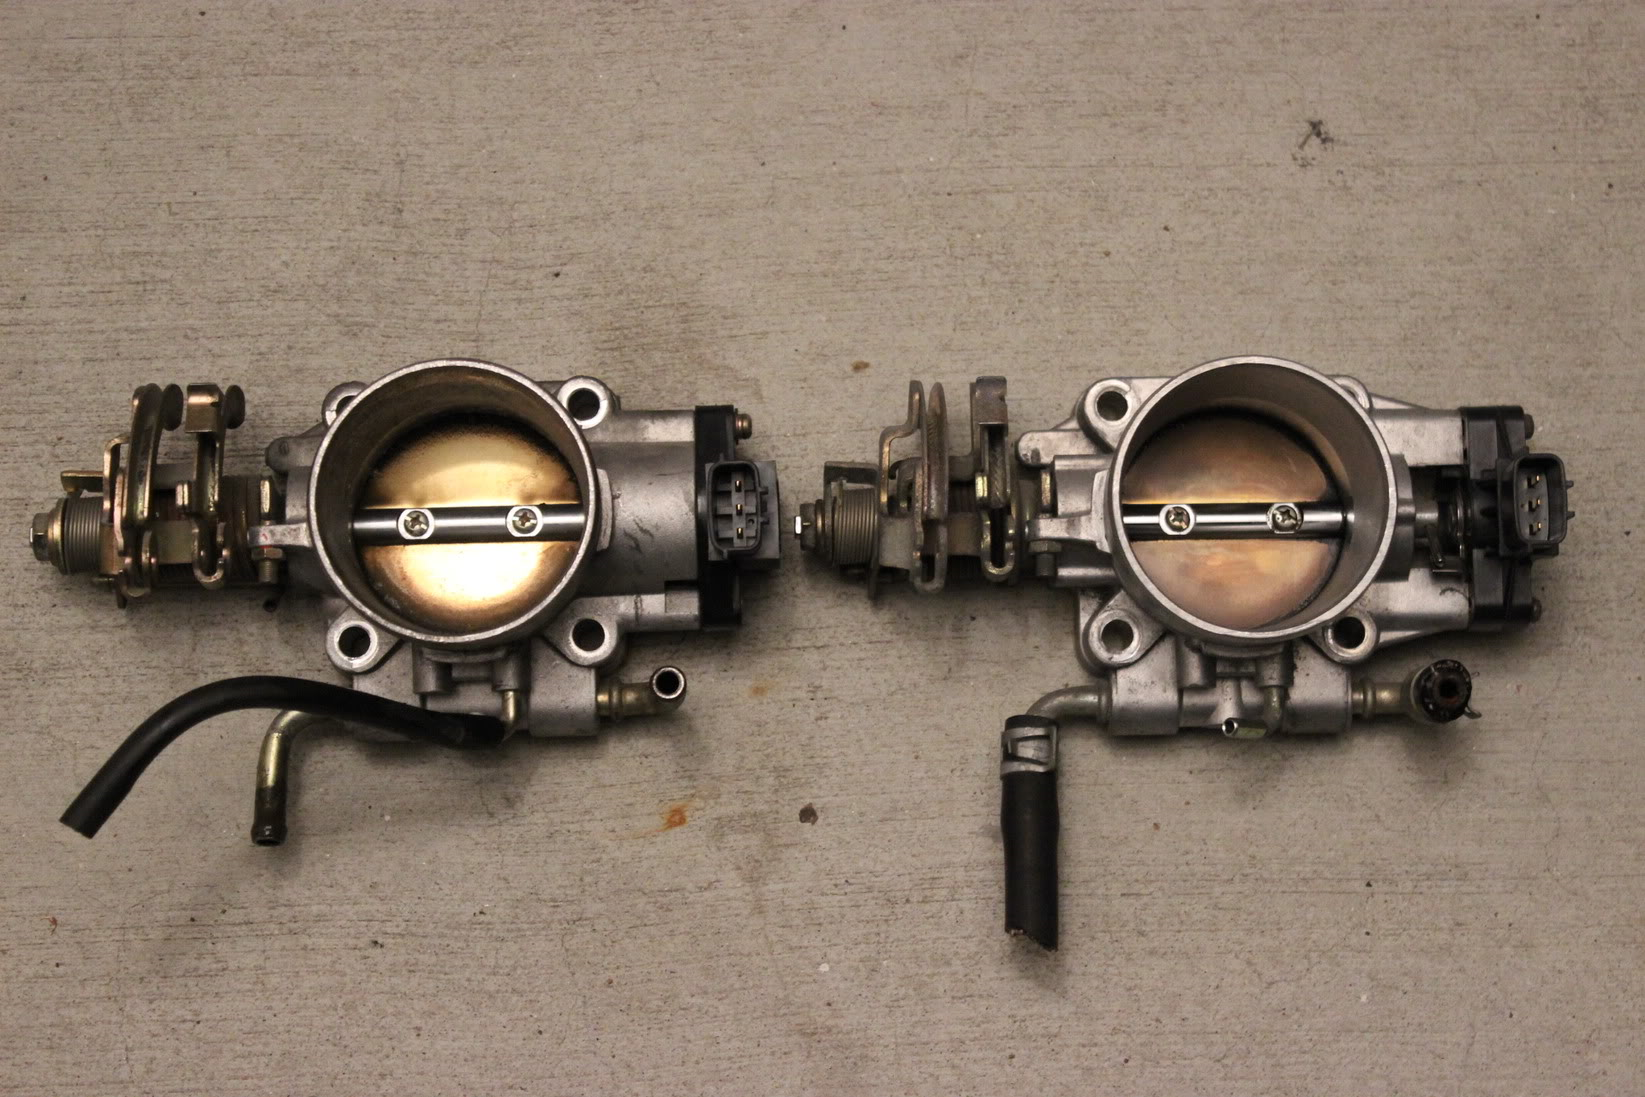
Swap your 99 P11 lowport throttle body for a P10/B14 Highport throttle body and sensor (no you cannot just swap sensors)

They are physically different where the sensors attach to the throttle body and the sensors are electrically different
Image
Image

Image
Image
Image
Image
Image
Image
Image
Image
Matt
Site Admin
 

Posts: 8990
Joined: Sun Jan 29, 2006 1:45 am
Location: Adelaide, Australia
Contact:

Re: How to repin later OBDII ECU to work with early OBDII ECU

Post by Matt »

Thanks. You can attach photos directly here (they upload to my server) rather than photobucket etc
Post Reply